Originally published Spring 2017 in The Score, the quarterly journal of The Society of Composers & Lyricists, by Designing Music Now, and by Scoring Notes.

 Not every score will need to be written down as sheet music before it’s recorded. However, if you’re hiring musicians those players almost always need something written down for them. Scoring for media is very particular and the parts for live players are usually written out note for note. Composers vary widely in their need and ability to notate their ideas, but generally the larger the project is and the more live musicians there are, the more important sheet music becomes.
I’m fortunate to work almost exclusively with live ensembles. As a result, my career has been largely centered around sheet music for the last 15 years. In addition to being a busy orchestrator and working with live orchestras all over the world, I also do a lot of work with sheet music publishers and I was part of the development community at Sibelius before it was sold. I am deeply into notation in a way that only a small subset of musicians are. I’m going to share some tips and tricks about sheet music preparation that may help to improve or streamline your processes, hopefully resulting in more free time and better art. The basic workflow I describe here is usually the fastest and most accurate way to get from raw MIDI to a printed score.
Sheet music is both a creative opportunity and a cost center
If you are outsourcing the creation of sheet music, then score prep becomes a hard cost that’s difficult to work around and it can be a big one. If you have the time and experience to do it, preparing your own sheet music can save a lot of money. It is also a chance to look at your music in a new light because it can be very clarifying to see your music the way the musicians will see it. If you use a copyist, they usually won’t have any authority to change the music. When you notate your own music you get another opportunity for creativity before your sessions. It can be very time consuming, and schedules often will not permit you to take that time, but score preparation can be a valuable process both monetarily and creatively.
The cost of good orchestration and score prep might be worth it though. At every budget level, it’s common for half of the music budget or more to be used during the recording days. In order to keep costs down, every effort must be made to achieve both speed and quality in the studio. One of the keys to efficient recording sessions is excellent sheet music which is well thought out and appropriately notated for the context.
Sheet music is a written language which allows the abstract concepts and emotionality of music to be written down, much like written words can express the abstract nature of thoughts and feelings. Different instruments and genres may require different dialects of notation. If your music is fluently and eloquently written then your communication in the studio will be substantially more effective, leading directly to a better end product. If it’s not well prepared, it can cause confusion and unnecessary questions which waste expensive studio time.
Tim Davies sums up the importance of appropriate notation nicely. “When you put new music in front of an orchestra, be it at a session, a read-through in college, or a rehearsal of the London Symphony Orchestra, they have to read the notation at face value. Understanding today’s performance practice – or more precisely, the lack of a standard practice – becomes very important, and will help you spell things out in a way that gets exactly the sound you’re looking for in the clearest and most concise way possible.”
From the demo to the page: The best workflow
Whichever notation platform you decide to use, you need to know it inside and out. The software won’t do everything for you. When it’s time for score preparation you usually won’t have a lot of time, so you can’t be digging through manuals or menus to figure out how to make the tool work. As always, the final product is only as good as the person using the tool. Study the software thoroughly, and for the love of music don’t try to use the built-in notation in your DAW for anything but the simplest of tasks.
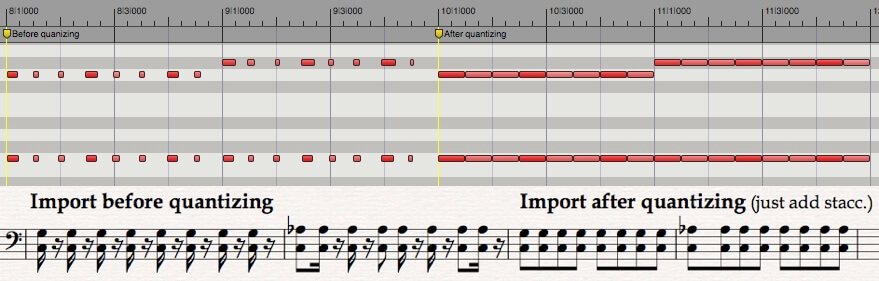
To get from your DAW to a finished score as quickly and precisely as possible, you must be aware that there is a big difference between performance MIDI and notation MIDI. That’s part of why the built-in DAW notation is always heavily flawed. The way we perform notes is not the same as the way we write them on the page. When converting a sequenced demo into sheet music the raw MIDI is wrong in many ways and always requires substantial changes.
For example, if you play staccato 8th notes the MIDI will look like alternating 16th notes and rests. If you intend to play a melody of even 8ths, your rhythm might be loose and they could come out as overlapping notes or more complicated rhythms. You may sustain a note with the pedal, but the MIDI shows a short note. A timpani patch may have left and right-hand samples spanning the whole keyboard, so the MIDI would notate the right hand on a second staff in treble clef. Instruments with octave transpositions like bass, glockenspiel, and celesta may be in the wrong octave. Keyswitches need to be deleted. The number of MIDI tracks in the demo is almost always different from the number of score staves, so the MIDI needs to be expanded or collapsed almost on almost every cue.
8th note figure:
Sustain pedal:
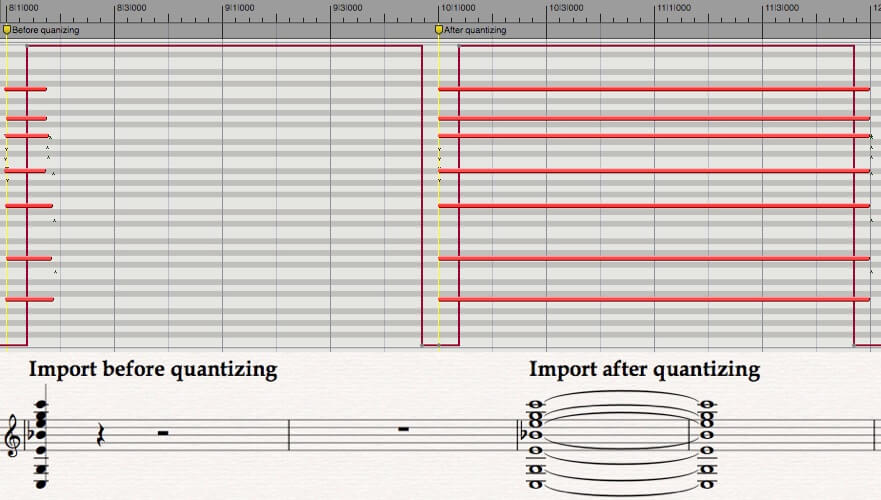
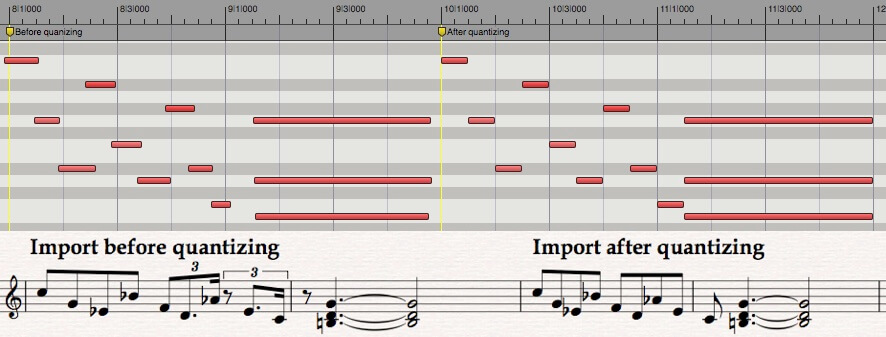
When preparing to export MIDI you need to examine every single note and think about how it needs to look on the page. This first step should absolutely happen in your DAW, not in notation, and it’s something you can probably do much faster than anybody else because you already know your intentions. All notes should be quantized to the exact durations you want to see on paper, meaning you quantize both the attacks and releases. Before exporting your MIDI you should go through each cue, track by track and note by note. Note overlaps that create a legato feel in the demo should be removed. Tracks that use the sustain pedal should have the notes extended to their full duration. Percussion note durations almost always need to be fixed because they are almost always either too short or extremely long to allow for a sample’s ring-out. It sounds slow, but it’s much faster in your sequencer than in notation.
Loose rhythms:
You should always add key signatures and time signatures in your MIDI files because it makes the MIDI import cleaner. It is simpler to change time signatures in your DAW and you need your DAW to match the score anyway, so make sure they are all correct before you export. Time signatures can be changed later of course, but there are some artifacts created by those changes in the notation programs which are nice to avoid.
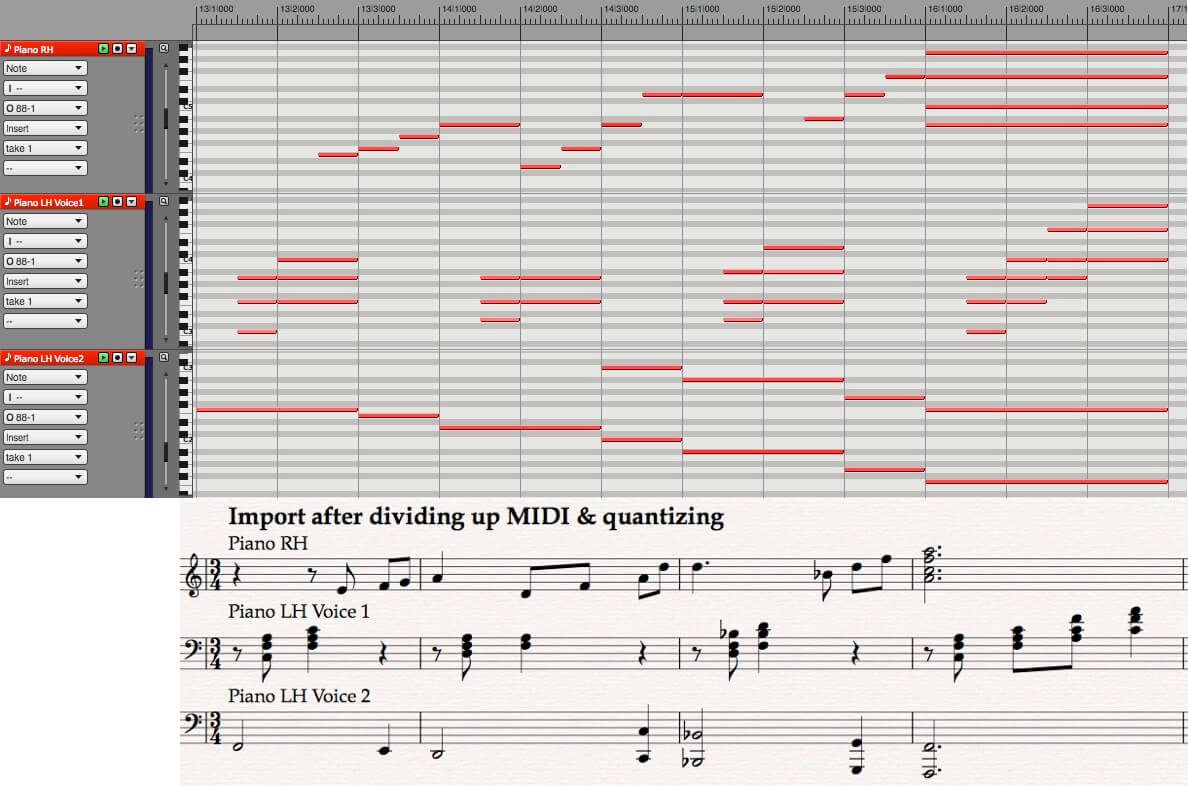
If you have MIDI tracks that will become multiple staves on paper, it’s best to divide that MIDI up into multiple tracks in your DAW. When too much information is on one track, the notation gets messy and sometimes impossible to decipher. Instruments that use the grand staff like piano and harp need the hands separated to two different staves. Single tracks for 4 horns, full string ensembles, drum kits, and other similarly layered tracks need to be divided also. It’s sometimes helpful to split up notes which will be notated as separate voices on the same staff. The note values will import properly when they’re alone, and you’ll be able to simply merge them instead of correcting the notation.
Raw piano MIDI: All on 1 track, everything overlapping, rolled arpeggio chord at end.
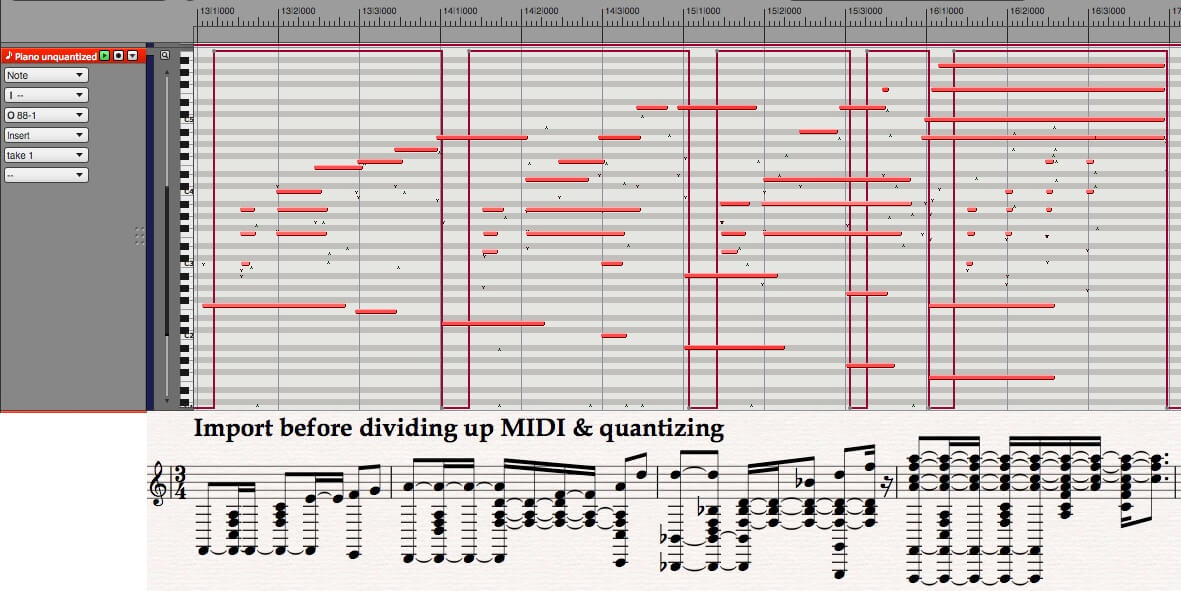
Clean piano MIDI: No overlaps or rolled chords. Right hand only needs arpeggio line. Left hand just needs to be merged to use two voices.
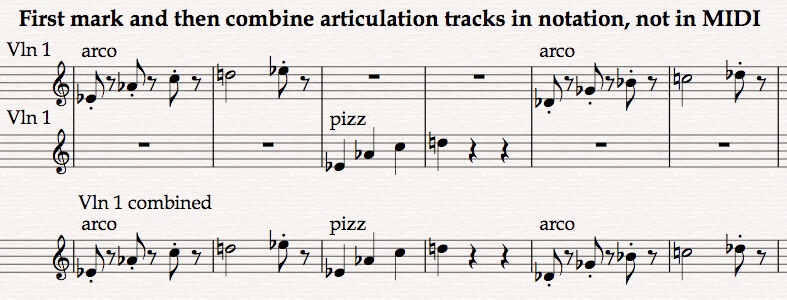
Conversely, it is very common that MIDI tracks need to be collapsed down, but that is usually best done in the notation program and not in the sequencer. For example, you may have 10 different tracks for violin all using different articulations, and the distinction between articulations would be lost if you put all the notes into one MIDI track. In that case, the fastest and best method is to import the 10 violin tracks to notation, add the appropriate articulations to each track throughout, and then copy/paste the notation into one violin staff. This approach could also work with brass articulations and effects, multiple guitar sounds, multiple sample libraries which are layered, or anything else.
Before you export your MIDI, think about whether your DAW uses non-destructive quantization or not. Some do and some don’t. If yours does then you may need to tell it to apply the quantization destructively before exporting, or else your export may be the original untouched MIDI. When imported to notation your quantization might not produce perfect results, so the next step should always be a quick proofread of the rhythms. You may need to correct any number of things, but things like momentary note overlaps, grace notes, percussion notation, harmonics, fermatas, divisi, glissandi, and tremolos never import properly and always need manual fixing.
Now that your rhythmic notation is correct, the next step is to get all the music onto legal score staves. Depending on how you programmed your MIDI this might be a simple or a nightmarish task, and this is where your orchestration choices begin. A trombone section patch would need to be split into the appropriate number of staves, but if you have a three-note chord and four trombones you have a choice to make. The note you assign to the 4th trombone makes a big difference in the tone of the chord. Those kinds of little choices compound continuously, so as you wrangle your MIDI into place you are actively sculpting your music. Strings can be particularly difficult to reduce to the requisite 5 staves, especially in active or epic music.
Notation is highly subjective – enjoy it!
Once the MIDI is on the correct score staves, the orchestration work can begin in earnest. Many people incorrectly define orchestration as the assignment of notes to instruments, something you already did when making your demo. That is more correctly called instrumentation. Even most published orchestration books are actually only about instrumentation. Orchestration includes instrumentation, but it is much broader and includes arranging, voicing, dynamics, expressive markings, articulations, phrasing, breaths, bowings, colors, the balance of acoustic mass, conductor markings, and any other aspect of music notation that you can think of. It is the art of managing groups of instruments and explicitly notating all of the subtleties of the music in order to help the music to speak with maximum eloquence. The orchestration is just as important as the instrumentation, and an orchestrator with experience and good technique can elevate the quality of the music substantially.
Choose a systematic way to mark up your music, either one measure at a time or one staff at a time, and work the cue from top to bottom. Sight reading music is difficult enough already, so you want to give your players as much help as possible at the recording sessions. The more detail and subtlety that you can notate, the more likely you are to get the performance you want. Dynamics should be reiterated after long rests. Every articulation should be clarified and every phrase marked. When necessary, give indications about the click and tempo. Provide courtesy accidentals. Consider bowing, breathing, and tonguing. If the music notation seems like it’s still not specific enough, then use language to clarify. Try to anticipate every question the musicians might have, every mistake they might make, every subtlety they might miss, and give them the information they need to capture your vision.
However, be wary of over-notating. Some composers try to turn every MIDI controller move into a dynamic marking, but that kind of detail gets a bit silly and counterproductive. Always stay aware of the natural tendencies of the instrument, and don’t bother to explicitly write out things that they will do automatically. For example, an electric guitar needs a crescendo hairpin at the beginning of a quiet chord if you want to hear that. A string section often does not.
If you can leave out obvious or redundant notation it will keep the score cleaner and easier to read, and it will also be easier to make changes on the fly. If you feel the urge to over-notate because you don’t quite trust the players, ask yourself whether or not you have the right players. Tim Davies has strong opinions about over-notating. “Thinking they are doing the right thing, inexperienced orchestrators clarify things that do not need clarifying and state things that are either obvious to the players or an inevitable result of the notation or physics of the instrument. They do not know where and when the orchestra can be left to do its thing.”
It is very common to record in other countries because many foreign orchestras and individuals provide more competitive pricing and contract terms, and it’s very convenient to produce remote sessions from your home studio. If you are planning to record overseas, then try not to use English on your scores. Use the traditional Italian terms for everything. Players in Prague may not understand “a little more quickly” but they will understand “poco più mosso.” The Italian terms have transcended the language and become a part of music that trained musicians worldwide understand.
Create gorgeous print-ready music
Once your orchestration is finished, it’s time to begin cleaning up the score. This is where sheet music preparation turns into a publishing venture and not a musical one. The dynamics, articulations, slurs, and all other music elements have default placements, but many should be improved to get a really professional look. Some notation programs automatically avoid collisions between notation elements. Not all of them do, and none of them get it right all the time. At the very least you need to make sure that all of your music is clear, readable, and not colliding with anything else on the page. Also, make sure that everything is attached to the correct staff and beat. If an element’s attachment point is incorrect in the score, it may end up in the wrong instrumental part.
The layout of your sheet music makes a big difference in how it will be perceived. Always use portrait orientation, and make sure all of the scores and parts end with a full page. Pay close attention to the horizontal and vertical spacing, looking not only at the notation but also at the white space on the page. The balancing of white space is a critical aspect of all forms of publishing, and music is no exception. Adjust your layout so that the horizontal and vertical density of notation is similar from page to page, the pages are balanced within themselves, and adjacent pages are similarly weighted with music. This aspect of score preparation is very much a subtle art, and the automatic layout and spacing options in the programs only give you a start. For truly professional looking scores you need to control every aspect of music spacing yourself.
Recording sessions use slightly different conventions from published music. The first rule is clarity above all else. If clarity is ever at odds with the beauty and grace of traditional publishing standards, clarity wins. Conductor’s scores are in concert pitch. The scores are usually on 11×17 or A3 paper. Time signatures on the scores are oversized. All measures are numbered in both score and parts. Double bars are used very frequently. Key signatures are often not used even in tonal music, although that’s not a fixed rule.
The preparation of the instrumental parts is an iterative process, and once you have a system in place it’s not hard to do quickly. The staff size should be quite large to make sight reading in dim studios as easy as possible. Your margins can be small to help compensate for that. Page sizes are concert 9×12 or oversized 10×13. Whenever possible put a rest or an empty measure at the end of a page, allowing time for the eye to travel up to the next page or for a page turn. Your parts will inherit all the relative placements of the score, which should look good if you prepared the score well. Regardless, you will need to spend time doing good layouts and cleaning up positioning to make sure that everything is as clean and clear as possible. Always bind or tape your parts, because loose pages can easily cause wasted studio time. Taping is preferred because all plastic bindings make noise.
It’s wise to notate one big cue completely so that the score and all of the instrumental parts are complete and ready to print before you continue notating the rest of your score. Doing this will establish the notation conventions required for that particular score, and using that file as the basis for your notation template will help you avoid duplication of work as you move through the rest of the music.
Score preparation is a detailed craft that takes many years to perfect. These suggestions will only get you started, and a serious study of music notation and music engraving is required if you want your scores to look truly professional. If you plan to do your own score prep then your scores don’t need to be the same quality as a published master engraving, but they need to be very good and very clear. By doing it yourself you can save money, extend your creative processes, and further perfect your music. If you’re lacking either time or expertise, then orchestrators and music copyists can help. As with all things, it’s safe to assume that you get what you pay for.
If you don’t embark on a serious study of music notation, then at least have some references handy. Elaine Gould’s “Behind Bars” is a great one. A great resource about notation practice which is specific to our world of music for media isTim Davies’ blog deBreved. I highly recommend it if you’d like to learn more about the specifics of orchestration and notation grammar from a film composer’s perspective. But to explore the vast world of how notation and orchestration affect music, there is no better guide than scores of your favorite pieces of music.
 Jeremy Borum is the author of Guerrilla Film Scoring.
For a 20% discount go to http://bit.ly/GuerrillaFS and use discount code 7A20ASCAP
For daily Guerrilla Tips follow Jeremy:
![]()
![]()
![]()
![]()
![]()

